Believe it or not, back in the olden days, when the internet was relatively new, people were very hesitant about buying online. Nowadays, this might seem like a fantasy since online stores are pushing retail out of business more and more by the day, but if you have the opportunity, we encourage you to fact-check us through somebody that was there.
The distrust problems weren’t as banal as “we’ll pay for something and get a brick in the mail” (although those weren’t uncommon), but mainly stemmed from the fact that you weren’t able to see and touch the products in person.
There are many brands, and while the sizes are the same on paper (not taking regional sizing into account), the cuts and molds aren’t standardized, meaning sometimes the sleeves are shorter, the pants are longer, and the shoes are wider across different brands within the same size category.
Over time, and coinciding with the growth of the web as a market (among other things), people have become accustomed to ordering without “feeling” their products first, but the issue of clothing sizes still remains. Size charts have become widely available to the public, something that was a tool for production and distribution, but it’s used in such a roundabout way on webshops that it’s a wonder customers get anything right.
Most of the time, a general size chart will accompany an item on the product page. The problem lies in the fact that the chart isn’t always accurate (usually the same chart is used for every item on the site), being just “some chart” found on the web, or alternatively a generic chart from the manufacturer. Alongside the questionable functionality, your customer is forced to manually check everything concerning their sizes, i.e., take their measurements and compare them to the chart.
All this being said, every apparel webshop out there should at the very least look into implementing a more functional size chart tool like the one Kiwi Sizing offers. Frankly, it’s kind of strange that such a useful tool hasn’t become a standard throughout the industry.
Get every order right
There isn’t a single seller in the world who doesn’t want their sale to go through without a hitch, and that includes everything after the purchase has been made, more specifically returns. If a clothing item doesn’t fit, it’ll be returned, which is bad news for your store (dispatching a new item, dissatisfied customer, refunds, etc.) and for your customer (disappointment in the product, hassle with returns, etc.) and should therefore be lowered to the bare minimum of cases.
What Kiwi Sizing does is implement your site with three different ways of finding out the ideal size that subsequently eliminates the possibility of any errors. This means that orders are fulfilled without returns, there are no abandoned cart issues stemming from insecure customers, and there are no additional costs for you or the customer. The latter could even be important in determining product prices if savings from a lack of issues is significant enough.
It’s important to note that Kiwi Sizing works on all relevant eCommerce platforms that are used today, such as WooCommerce, Shopify, Wix, Magento, etc., but for our review, we’ve used the WooCommerce plugin version for WordPress. By doing so, we hope to be relevant to the widest group of people (if you take into account the popularity of the two platforms compared to others), even though the entire process of implementation and management is streamlined and user-friendly to the point where anyone can handle it with just a little bit of practice.
How to make it work
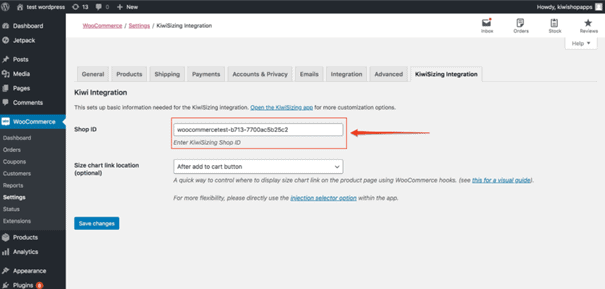
Since we’re taking a look at how Kiwi Sizing works as a WooCommerce integration, it’s natural to start at the beginning – connecting the two. The process is divided into a couple of easy steps that will get you from zero to ready in just a few moments. Firstly, you need to activate the plugin, followed by integrating it with your WooCommerce installation. This is done by logging into your Kiwi Sizing app (that’s separate from your dashboard) and getting your Shop ID. Simply copy this ID into the designated field located within WooCommerce settings. By doing so, both are now connected, but the process isn’t over just yet.
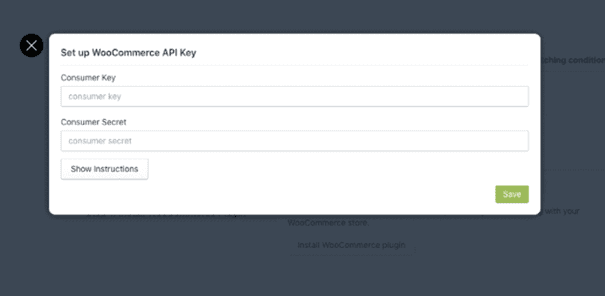
While you’ve connected your shop and the app, you still need to do the same for your product database. Linking the app to your products makes it significantly easier to create all the size charts and recommendation formulas you’ll be doing because you’re adding attributes to already existing items instead of creating everything from scratch.
Simply navigate to the “Add WooCommerce key options” section within the app to fully complete the integration process.
With the setup and integration process finished, you’ll find that the Kiwi Sizing app now has your entire product database. Through this connection, the app will intuitively give you an estimate on how many products the sizing charts can be applied to.
Sizing up your products
Everything up to this point has essentially been preparation that gets you to the point where you can create and assign size charts to your products. There are more advanced features you’ll be able to use to your advantage, but it’s always smart to start at the beginning.
The option you’ll want to go to is aptly named “Create new sizing chart” and will be your main place of business while working with the app.
If you’re a newcomer to web design and management, don’t worry, the creation of a sizing chart is a guided step-by-step process, much akin to setup wizards we’ve all encountered at one time or another. As such, you’ll get the ever-welcome option of creating a chart from a preexisting template you edit and build upon or working from scratch with an empty chart for those more adventurous among us.

The templates found in the common design section cover all your usual clothing apparel, from shirts and shoes to trousers and underwear. It’s important to note that these templates are not just obscure guidelines where you still need to do much of the work before they are usable. Instead, they’re fully functioning charts that need just a couple of tweaks, a “personal touch,” if you will, and can be instantly published to the frontend.
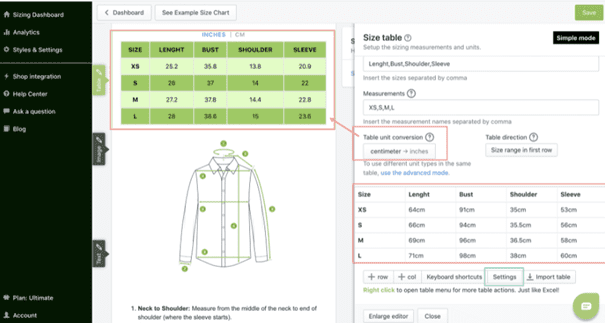
The size chart comes with a detailed preview of the product that enables your customers to easily measure themselves in order to figure out their size. You’ll need to choose the size table fields, product images, chart style, and measuring unit, with the first three coinciding with the overall design and theme of your site and the latter centered around your target audience (inches or centimeters).
On the other hand, creating a chart from scratch is a much more taxing endeavor, which can be made easier by uploading a sizing chart you’ve already had/used. Ultimately, however, you’ll get to the same place as if you’d used a template, with the main difference being manually inputting the measurements into the table.
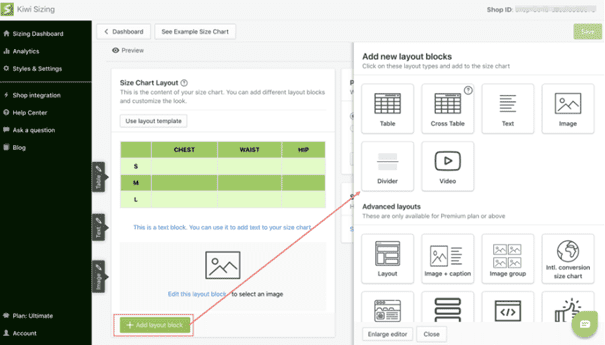
At this point, you’ll just need to go through some finishing touches before you’re ready to publish. By selecting the “Add layout block” action, you can add a plethora of elements such as images, videos, additional tables, etc.
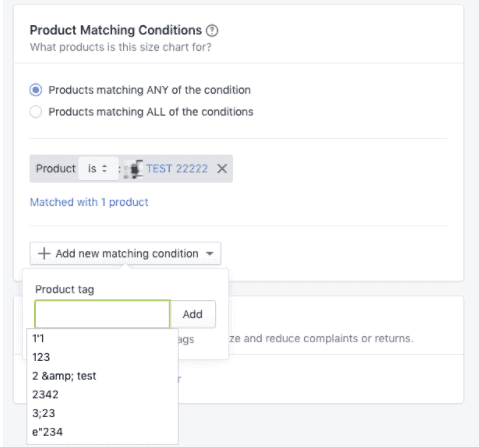
Finally, you’ll need to match up your product with the appropriate chart, by going to “Add new matching condition” and finding your way through the options. Items can be quickly connected to the chart using the “Product” button that acts as a search function allowing you to type in the items’ names and connect them on the spot.
Going a step further
Size charts are always good to have and should be a standard for any webshop that deals with clothing apparel sales, but ultimately it’s not the pinnacle of what you can offer your customers. The general size chart is essentially a DIY tutorial where most of the actual work is still required from your customer. What if you could, instead, do all the work for them, where they only have to fill out a few basic fields – in comes the size recommender.
After you’ve created your charts, you can take it to the next level by going to the “Size Recommender” tab and creating a simple-to-use calculator that makes size choosing from the frontend synch. Keep in mind that you’ll still need your charts because the recommender pulls the data from them as results, based on the input data a customer has given i.e., if there are no charts, there are no results.
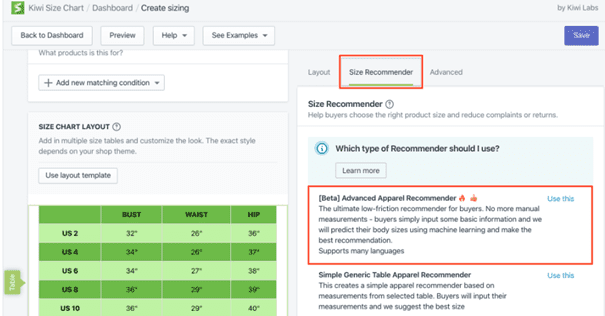
In order to get going, you’ll need to choose the type of recommender from the three that are available. The generic recommender lets your customers input their measurements and, in turn, receive the recommended size as a result. Note that the connections between the measurements and sizes are all derived from your size charts for the selected product.
The custom recommender works in much the same way except the results aren’t derived from your size charts; instead, you make the connections manually. Let’s say you work with primarily European manufacturers that all adhere to the same size chart for each clothing item. However, you’ve recently gotten your hands on some American jeans that diverge from the standard of the other products you usually sell. In this particular instance, you can use the custom recommender to manually assign measurements to sizes in a different way than would be done using the default settings.
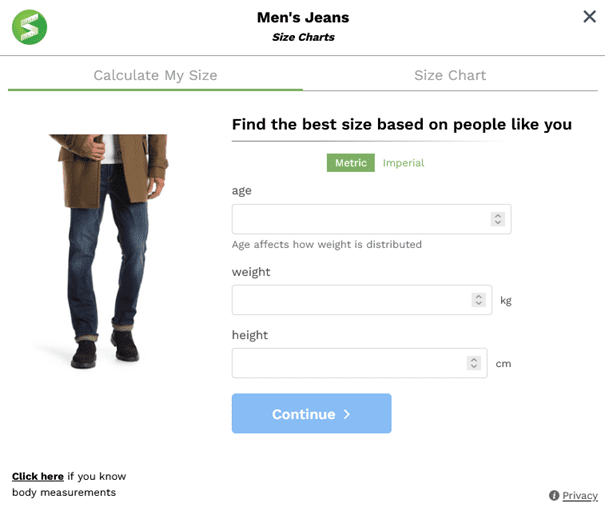
The third option is the “Advanced Apparel Recommender”, and honestly, this is the one you’ll look to use most of if not all of the time. This recommender makes use of machine learning to give the best recommendations. Your customers won’t have to take any measurements and instead give some basic information like age, weight, and height that will lead to their recommended size.
After you’ve chosen the desired type, you’ll have to also choose the connected source table (no choice is needed if you have only one active – it’s automatically chosen). Once you’ve got your table in place, you’ll get to add any extra product attributes that will be used for sorting your products like the product category, gender, and age; for example, a “female” “no sleeve dress”.
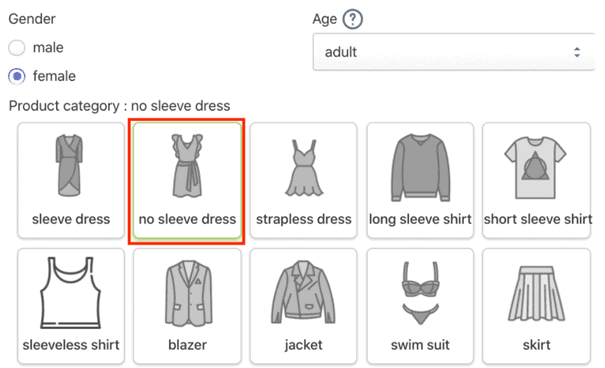
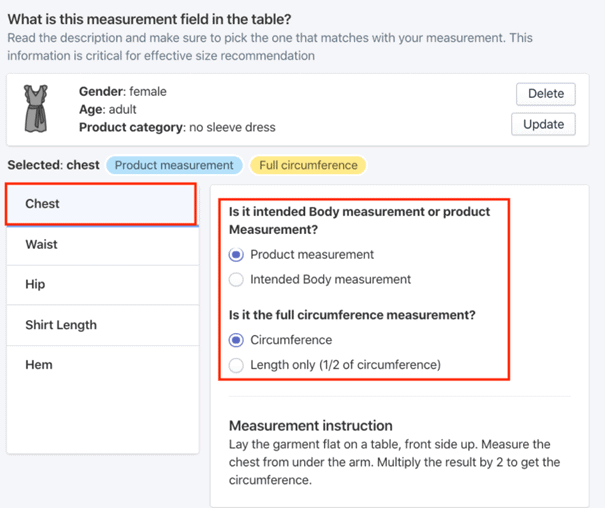
Now, every clothing item has some defining measurements which are totally unique or somewhat unique. For example, long-sleeved shirts will need chest, shirt length, and sleeve length, whereas a skirt or jeans will need waist and hem or trouser leg length measurements. You’ll have numerous measurements to choose from, but you really should single out a couple of key ones that are crucial for a given item – in the case of our dress, it would be bust, chest, and waist.
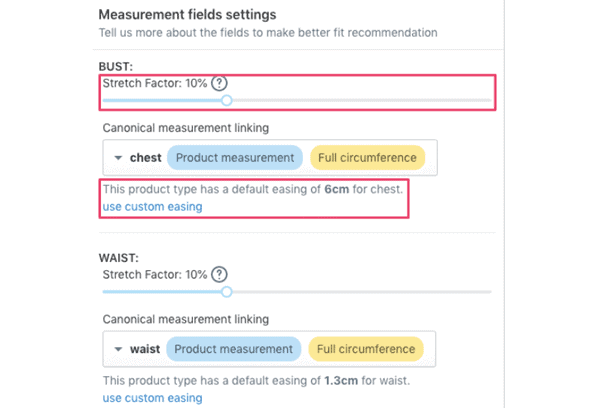
The final step before your recommenders go live is implementing the deviation percentages. Since very few people fill out the generic measurements perfectly, it’s important to show them there is some leeway when comparing the numbers. The default value is 10%, which means that if your numbers are within that deviation to the generic measurements, either bigger or smaller, the recommended size still applies. When setting up your +/- be sure to factor in the stretchiness of the material – there’s a vast difference between a regular pair of trousers and a pair of yoga pants.
With that final step out of the way, you’re ready to publish, and your customers are all set to enjoy the added features of your new and improved webshop.
Summary
Every shop owner/manager knows the effect returns and/or failed conversion could have on your bottom line. It is, therefore, crucial to implement as many tools as you can to keep figures for those items as low as you can.
Kiwi Sizing for WooCommerce is an all-in-one plugin that’s bound to accomplish just that.
If you’re running any kind of a webshop that deals with clothing apparel, and when a plugin like this comes along that can elevate the whole thing in such a way, you owe it to yourself and your customers to, at the very least, give it a go.