The ever difficult business of managing a store (virtual or otherwise) has gotten increasingly more difficult in the last couple of years. Even taking the current situation aside, there are simply much more factors to consider. Shipping routes are constantly changing and being delayed, and there’s a lack of warehouse space to keep stock. There’s a much bigger emphasis on promotions since the prices are going up, etc.
Now a retail store doesn’t have some of these problems – customers enter, buy something and then leave. Webshops have much more to consider, first and foremost, how they’ll get the purchased items to the customer.
The Ultimate WooCommerce Shipping Tool
Going simply by the numbers, most stores on the web (excluding the multibillion-dollar ones) run WordPress as their chosen platform with the addition of WooCommerce that makes their “regular” site into a webshop. It only stands to reason there is where our focus should lie – finding the perfect tool that will give you that extra level of shipping customization. Granted, WooCommerce does come with some default options. However, these are rather rudimentary to such a degree that you’re better off using them just to get familiar while building the site and then switching to something more before you go live.
A plugin that offers fully customizable shipping options is WooCommerce Table Rate Shipping, an advanced plugin that changes the default setting completely. You’ll find it hard to believe both are used for the same thing.

The Little Nuances Make a Difference
Let’s dig a little bit deeper into what the WooCommerce Table Rate Shipping plugin really is and what it provides. The default shipping options you’ll have available will greatly limit you. Yes, there are fields you’ll be able to fill any way you want, but it’s always the same fields and the same settings.
With this plugin, you’re blowing the door wide open. Unlike the default solution, you’ll be able to create custom shipping methods with associated rules where prices change automatically based on conditions you’ve predetermined.
Creating rules that affect all your products across the board, or only those with specific product classes, will give your customers a much fairer shipping rate.
Let’s say you’re a wholesale fruit seller – all your deliveries are one overnight because of the nature of your products, and the only thing worth determining is whether you’ll be assigning price by weight or number of items. Therefore, you can use the same rule for everything making the only distinction the shipping location. Still, again, chances are, you’ll be a local or regional seller because of your product.

On the other hand, you can have a clothing store, where probably it won’t be the same to ship a shirt, a pair of sneakers, or a coat – it could be due to packaging, handling difficulties, or something else, but prices vary based on the item. Well, in this case, you can actually set up the rules so that specific items have specific rates – why should a customer pay the same to get a box of sneakers as one that buys a coat that needs to be pressed and specially packaged.
These little things make a difference, and the customers do notice. The cycle is pretty clear here – satisfied customers lead to more conversions, which leads to more revenue.
Charging by Item
Finally, we’ve come to the part advertised in the title – how to set up the plugin that enables you to charge a fee by the number of items in the cart at checkout. Let’s start at the beginning i.e., with the shipping zones.
Shipping Zones
Before you make go about making all your rules, you’ll first need to set up the shipping zone those methods and rules will apply. This means you’ll need to go over to the WooCommerce settings and access the shipping tab. Once there, you need to pick out the region your rules will cover. These regions are relatively straightforward – you’re offered a dropdown menu to select a country or a state (both singular or plural). The actual range you want to cover is completely up to you. The plugin offers virtually endless possibilities.
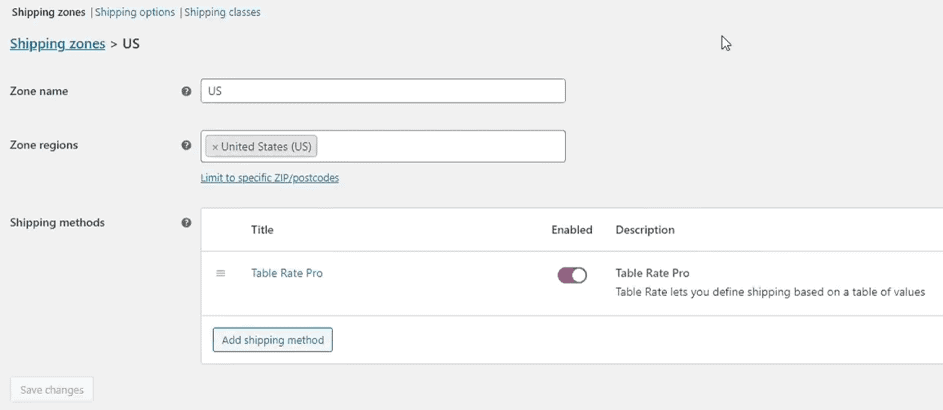
Once you’ve named the zone and assigned the region(s), you’ll need to add the shipping method. Upon clicking on the designated button, a pop-up window will appear, giving you the option to choose the said method. Remember that the WooCommerce Table Rate Shipping plugin doesn’t remove the default selections, so they’ll all be visible here, but the one we want is aptly named – Table rate Pro.
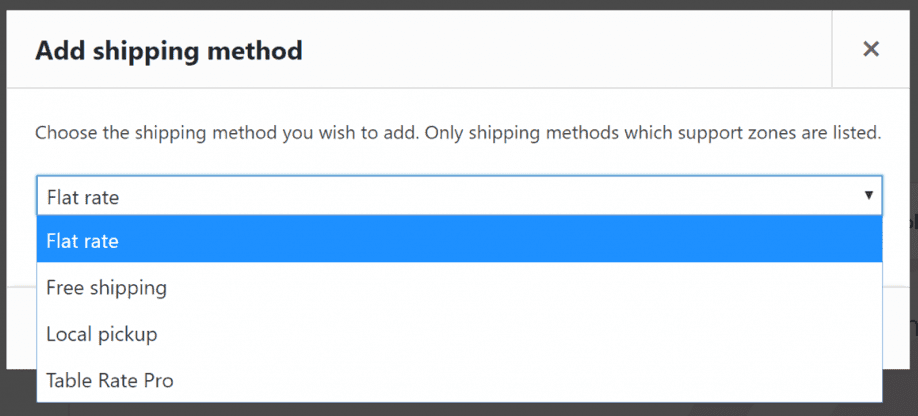
With that, the method is selected. Just be sure to enable it by clicking the appropriate button. Before that’s done, it won’t be activated.
Editing the Method
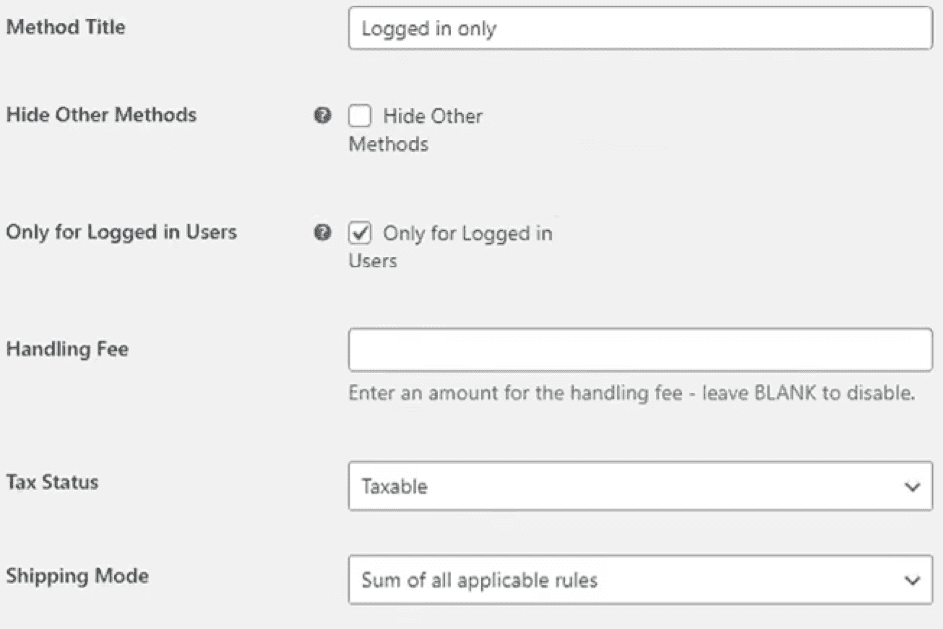
Once the method is visible in the overview, you’ll need to edit it in order to set up your rules. The first thing you’ll see is the option to enable/disable the method – this is the same thing you can do in the overview. Next is the method title, followed by other basic options.
The title is rather self-explanatory. The “Hide Other Methods” box enables you to, as the name says, hide other methods from view on the frontend. Much the same as the “Only for Logged in Users” which hides the method from anybody that isn’t logged in. The handling fee gives you the option to add an additional fixed cost that’s applied for products encompassed by the method on top of every other rule you’ve set.
This is usually reserved for products that require special packaging, like securing fragile items or something similar. The tax status also speaks for itself, and your choice will probably hinge on regulations of the country/state you ship from and the ones you mainly ship to. Finally, you can also set the shipping mode to the one that works for you.
Advanced Rules – Charging by Item
After you’re done with the basic settings, it’s time to handle the rules, which you’ll access through the Rates Table. Here is where your product class meets the conditions that regulate the prices. We’ll go through them chronologically.

Shipping classes work in much the same way as the product category you’ve encountered within WooCommerce, only for – shipping. We’ve already covered it a bit with the fruit and clothes example, but let us elaborate a bit more. Essentially, you can create classes that function as groups or categories which can then be assigned to your products. If you do so, you’ll be able to single out these classes within the rules so that the conditions and prices apply only to those classes. For example, all things being equal, smaller items tend to cost less to ship than bigger items – if you’re working with a courier service, you know where the cut-off points are – these classes could potentially use those points as a reference. If you have a smaller number of items that don’t fall under the “regular” label, you could opt to leave the bulk of your inventory without a class, only adding it to those specific items.
Once you’ve selected (or forgone the selection) of your class(es), it’s time to set up the condition. You can choose from three available conditions – weight, total price, and item count. For each, in turn, the prices are defined by the total weight of items in the cart, the total value of items in the cart, or the total number of items in the cart.

We’re interested in setting up the costs based on the item count, so once that condition is selected, you need to set up the min and max value for which the condition is met. Naturally, the overall minimum value you can input is one, while the overall max value is infinite (indicated by the * symbol). Setting it up like that will basically cover every potential cart that will be made. You can always set it up in more detail – for example, one price for 1-10 items, another for 11-100, etc. – the option is there whichever way you opt to use it.
With the values out of the way, you need to set up the actual shipping cost, and there are two variables – the base amount and cost per item. The base amount is a fixed cost that’s added to any order that fills the condition, while the per-item cost, as the name suggests, adds an additional charge based on the number of items in the cart on top of the base amount. For example, you’ve set up a condition with the item count rule that activates if the number of items in the cart is between 1 and 10 and sets the base cost to 10€ with an added cost of 1€per item (no specific class is selected). The customer fills the cart with 7 items, meaning their total shipping cost for the order will be 17€.
It’s as simple as that. You can, of course, play around with the rules, adding any number of them to the selected method and even including other conditions, but we leave you to experiment with those.
Summary
The WooCommerce Table Rate Shipping plugin represents a simple handle yet a robust tool that you can use to create highly customizable shipping rules for your products. Stores with more complex stock will get more out of the plugin than those that offer a single product or one category of product. However, anyone who uses this will definitely see an upgrade in every facet of their shipping process regardless of their product diversity. It’s also worth noting that the same devs also developed the WooCommerce Order Export plugin that seamlessly connects with this one, so be sure to give it a try if you’re looking to step it up even further.