As YouTube is the most visited video platform this year, many people tend to upload a video in order to get their business’ attention. Whether you already have authentic content or at least ideas to create videos before the uploading process, you should be aware of YouTube supports any kind of marketing strategy today and also getting more subscribers to your YouTube channel would be an effective way to be recognised by those businesses.
Then, you can upload videos with peace in mind. However, there are some settings and video elements about how to post a video on YouTube process before jumping into it.
I start my post by giving the basic steps on how to upload a video on the desktop. Nevertheless, you will also find how to upload a video on the YouTube app in the desktop subject area. These steps share similarities and differences with each other. I underlined the similarities and highlighted the differences to be more understandable. Creating a YouTube channel and uploading videos easily will be our theme for this step-by-step guide. Nevertheless, there are several important considerations and tools to know before you upload a video on YouTube.
What You Should Consider Before Uploading a YouTube Video
- Copyright: Make sure you have the necessary rights and permissions to use any content (e.g., music, images, footage) that you include in your video.
- Length: YouTube has a 15-minute time limit for unverified accounts and a 12-hour time limit for verified accounts.
- Format: YouTube supports a wide range of video formats, including MP4, AVI, and MOV.
- Quality: The higher the quality of your video, the better it will look on YouTube. Try to use a high-resolution camera and ensure that your video is well-lit.
- Title and Description: Choose a video title and write a description that accurately reflects the content of your video. This will help viewers find your video and understand what it’s about.
- Thumbnail: Choose a thumbnail that is representative of your video and will attract clicks. This is one of the significant marketing strategy examples of your video content process.
- Privacy Settings: Decide whether you want your video to be public, unlisted, or private. Public videos are visible to anyone and can be searched for and found on YouTube. Unlisted videos can only be accessed via a direct link and are not searchable on YouTube. Private videos are only visible to you and the users you select.
- Tags: Add relevant tags to your video to help it be discovered by viewers searching for related content.
- Captions: Consider adding captions to your video to make it accessible to a wider audience, including viewers who are deaf or hard of hearing. You can also use a YouTube to text converter to transcribe your video’s audio into text, making it easier for viewers to read along or refer back to specific sections.
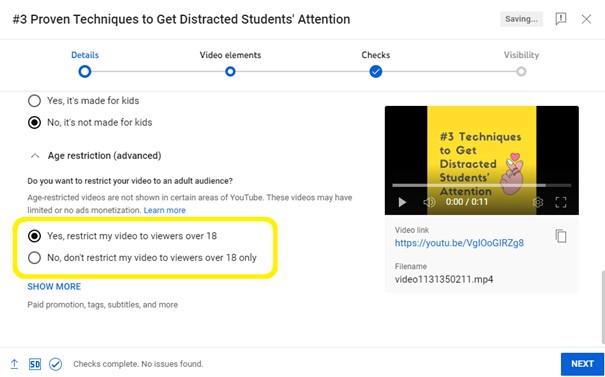
- Age Restriction: If your video is intended for a mature audience, you may need to set an age restriction. This will prevent children from viewing your video.
You might need to make a checklist for these details after you understand them. As a matter of fact, it really makes sense to make a checklist in terms of building high-qualified YouTube videos into your YouTube Studio.
“Must Have” Tools Before You Upload Videos on YouTube:
- A computer or mobile device with an internet connection: This will be used to access YouTube’s website or mobile app and upload your video.
- An account on YouTube: If you don’t already have an account, you’ll need to create one before you can upload a video. This is free and only requires a Google account.
- Video editing software (optional): While not required, video editing software can be helpful for editing and enhancing your video before uploading it to YouTube. There are many options available, both free and paid, such as Adobe Premiere Pro, Final Cut Pro, and iMovie.
- A webcam or camera (optional): If you don’t already have a video to upload, you will need a webcam or camera to record one. Most computers and mobile devices have a built-in camera that you can use or purchase a standalone camera.
- A microphone (optional): If you want to add audio to your video, you will need a microphone. Most computers and mobile devices have a built-in microphone that you can use, or you can purchase a standalone microphone.
After you consider the details and have the tools I mentioned before your video uploading, you can start to jump into the main steps only you can do on your YouTube page.
At this point, I will demonstrate the aspects of how to post a video on YouTube and how to embed Youtube channel to be clearer on my help. Please follow all of them carefully since your video uploads will appear in people’s search results in a short time. Let’s get started as goes:
How to Post a Video on YouTube – Given with Visuals
#1 Go to your Google account: click “Sign In”.
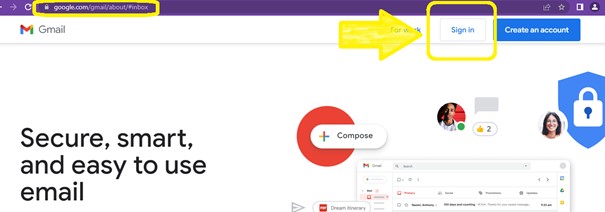
Your YouTube account may automatically connected to your Google account. It means you can directly open your YouTube account by signing in to your Google account. You can also open your account on youtube.com with the similar steps.
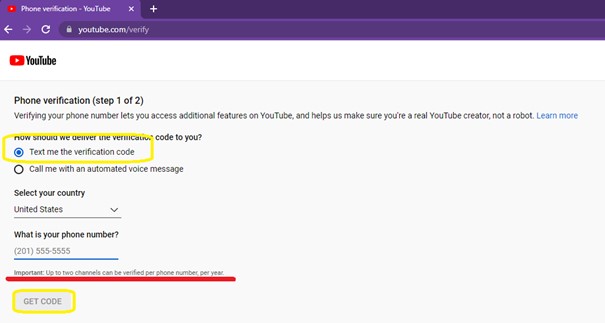
#2 Verify your YouTube account.
You may pass this step if you YouTube account is already verified by Google.
Now, open youtube.com/verify and choose the given option.
Benefits of Verifyıng Your Account on YouTube:
- Verification will create a checkmark next to your name, which helps you to build trust and credibility with the audience.
- You can upload a video longer than 15 minutes, allowing you to upload custom thumbnails.
- It is eligible to use YouTube’s Super Chat feature and many more, which allow viewers to pay to have their comments highlighted during a live stream.
- Verified accounts are eligible to apply for YouTube’s Partnership Program, which allows you to monetize your videos through advertising and other revenue streams.
Overall, verifying your YouTube account can help increase your visibility which can help you grow your channel.
Now let’s continue the “successfully uploaded” notification for your new video, let’s head back over to youtube.com to see how to upload a video to YouTube.
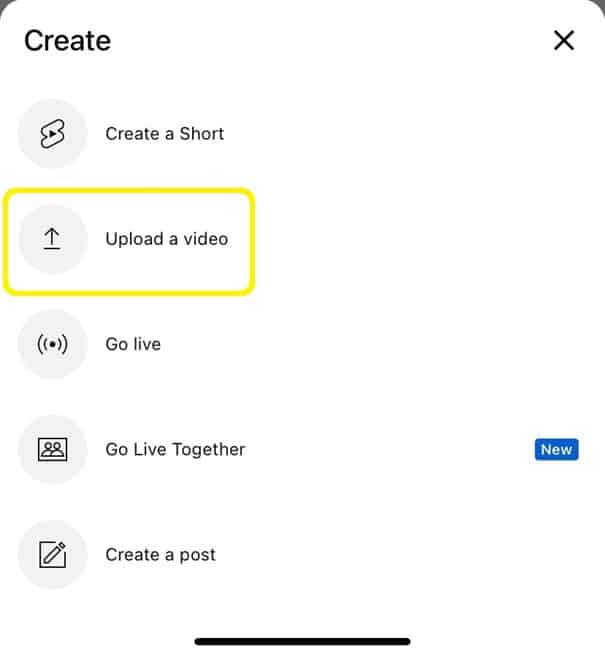
#3 Upload a video file.
You are going to see a camera icon with a plus sign in the center. It is the create button. Click this create button to see “Upload Video”.

Select the “Upload Video” option to see your video directly.
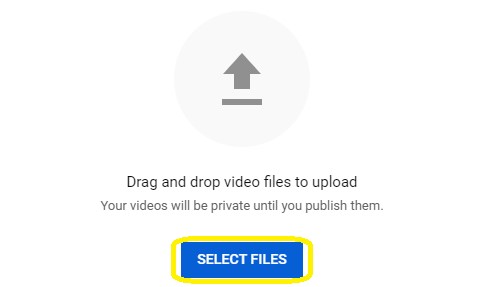
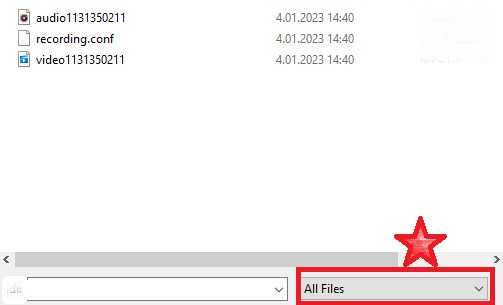
#4 It’s time to “Select Files”, or “drag and drop video files to upload” directly.
You can also choose all files.
#5 Control the process to see if the video is uploaded or not.
It will take a maximum of 5 minutes depending on your internet connection.
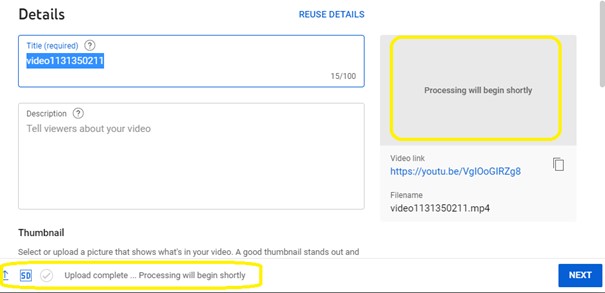
#6 Write the most appropriate “title” for the video.
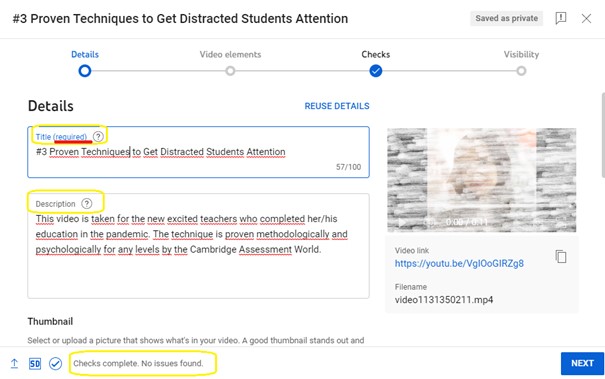
A title is required because YouTube categorizes after its understanding of what your video is about.
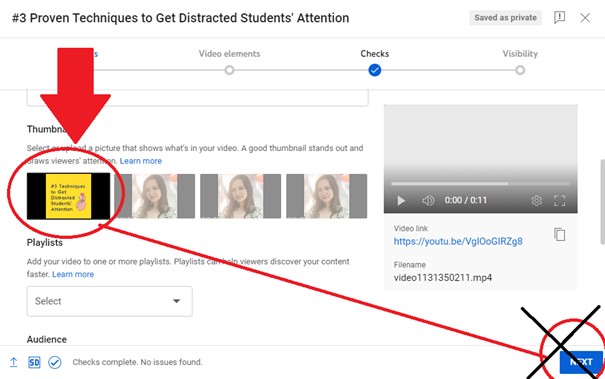
#7 Upload a custom thumbnail.
The custom thumbnail is the cover image of your content that is shown before the video is uploaded.
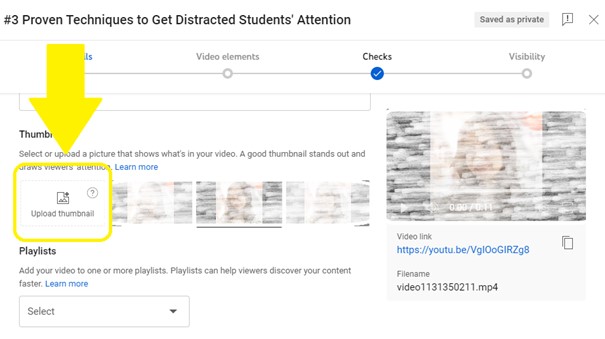
Find your own image to upload as a YouTube video thumbnail:
If you don’t have the frame on your own, YouTube will pick a random frame you can choose from your video.
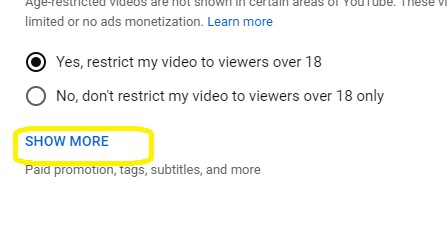
#8 Select if your video is created for kids or not.
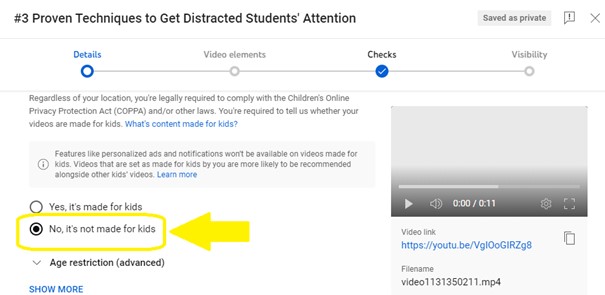
To see in a detailed way, look at the “age restriction (advanced)” section as it is shown below.
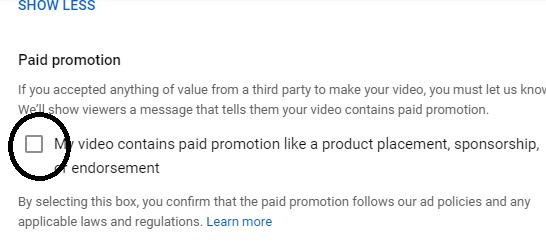
#9 Click “Show More” to provide spesific details about your content.
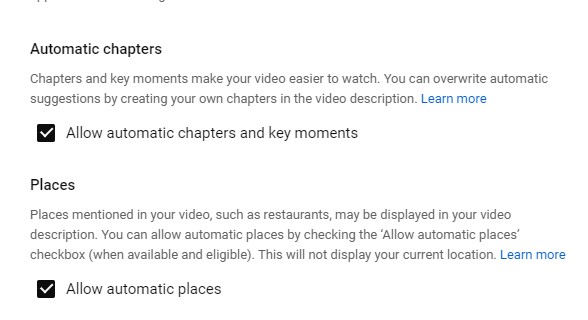
Tick the box in “Automatic chapters” if you want to reach automatic suggestions for your video description.
Tick the box in “Places” if you show some places in your video.
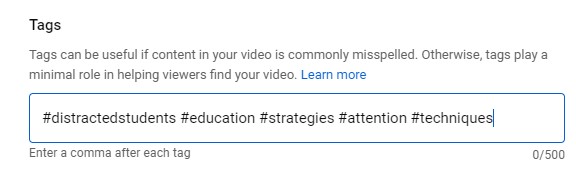
Write relevant tags to be specific on your topic.
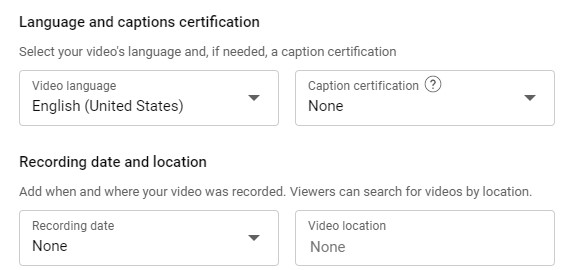
Choose your ” Video language”, “Recording date” and “video location”.
In “License”, you will see two options that are really important! Choosing “Standard YouTube License” is recommended.

However, if you want to allow users to use your content, you can change to “Creative Commons – Attribution”, which will allow them to mention your channel in their description.
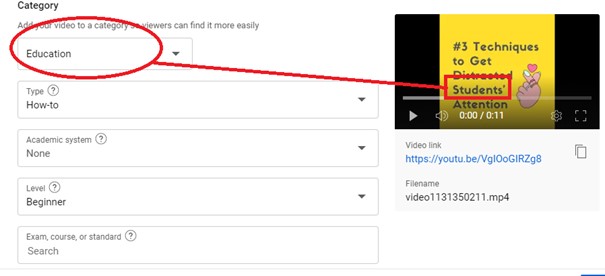
Categorize your video in the proper way.
I highly recommend you choose “Allow all comments” to engage your target audience.
The third option means no comments will be visible to others until you allow them.
The last option means nobody can leave comments which is never recommended as it keeps off the traffic that might lead to your channel.
The options below are optional to add to your YouTube video.
- To add subtitles, you should add a transcription.
- For the end screen, you should select the visual configuration. (Here you can leave the choice Google to pick as it defines the best for you). Do not forget to click “save” here.
- You can also set a card to your video with a playlist or another YouTube channel video.
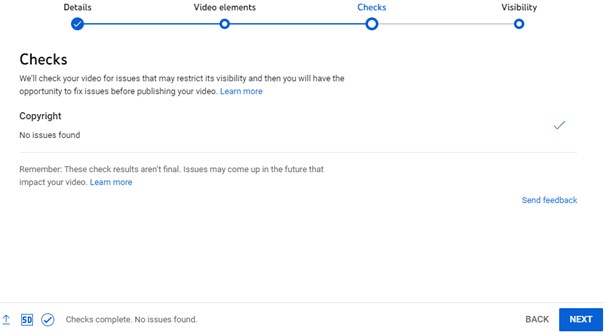
#10 Your content will be checked by the platform.
Google automatically checks your YouTube video to see whether it has any copyright and so on here.
#11 Set Your Videos Visibility
You can publish your content private, and then may invite some user who you want to watch videos.. Then, you need to mention their e-mail addresses. If you select “Unlisted”, it means you must send the direct link to the people you want them to watch.
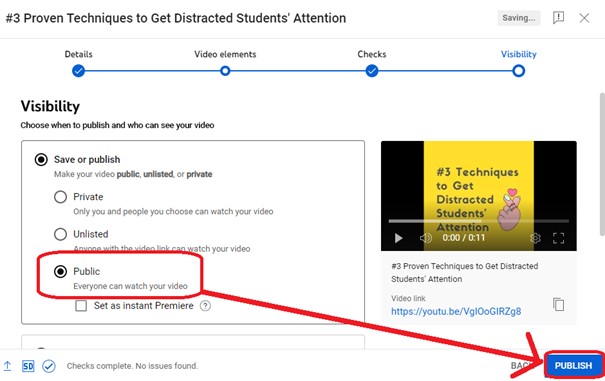
Or, you can scheduled date that you want to post the content.
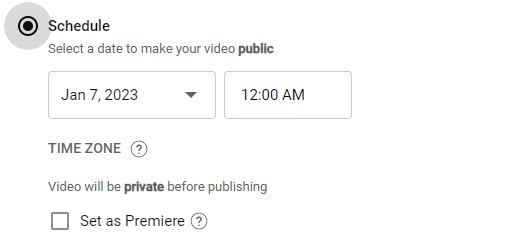
#12 Click publish.
Now it’s time start uploading your YouTube video.
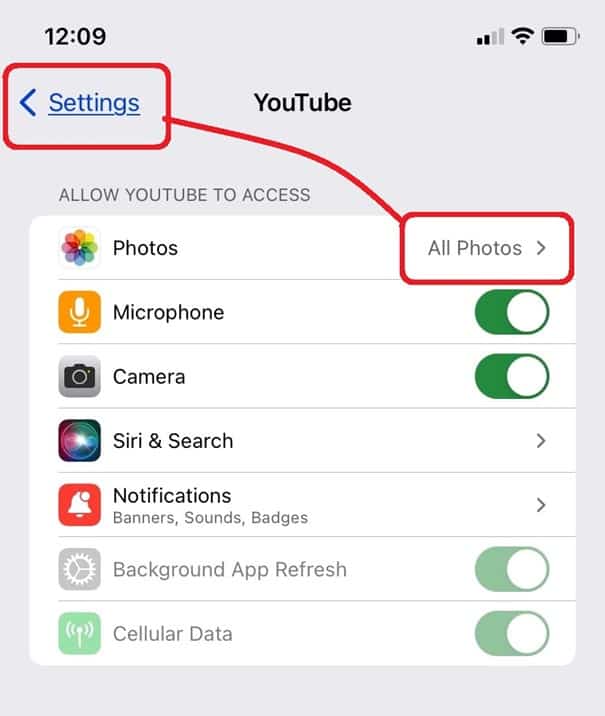
Uploading Video on Mobile App
If you are using YouTube mobile app, the steps are similar, but, you must allow the YouTube app to access your “All Photos” since the uploading video section wants app permission first.
Go to your mobile phone or tablet settings and find YouTube. Select what is shown below.
Open your YouTube app and click the circle with a plus sign-in.
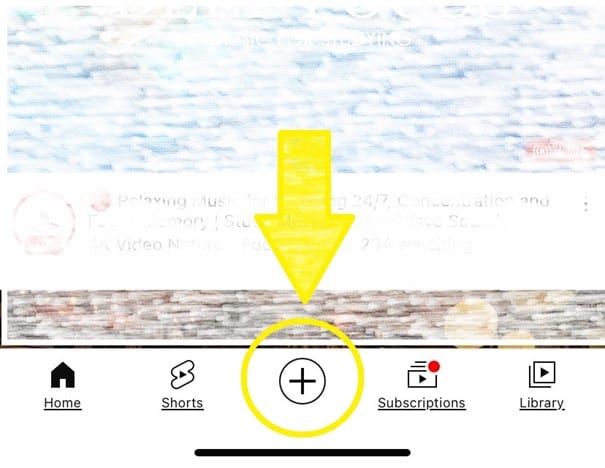
You will see the upload button there. Click “Upload Video”.