In the highly competitive eCommerce industry, it is crucial for store owners to efficiently market their products on various platforms to maximize visibility and, consequently, boost sales. Facebook and Instagram are the most popular social media sites that shape our digital lives. They have a huge number of people who might be interested in what you have to offer.
Envision a scenario where your WooCommerce store is fully compatible with these industry leaders, allowing you to advertise your products to a potential audience of over 2 billion people. A place where your brand’s ads float across the screens of potential customers, each one uniquely designed to pique their attention and encourage them to learn more about your business.
Imagine that potential customers are scrolling through their Facebook feeds and coming across your products right next to updates from their friends and family. Then, when they go to Instagram, your products and services follow them there, drawing them in with beautiful pictures and suggestions that make them want to learn more.
By connecting your WooCommerce store to these social media giants, you create a symphony of brand exposure that goes beyond traditional boundaries and leaves a lasting impression on potential customers.
In this article, we will explore the many benefits of integrating your WooCommerce store with Facebook and Instagram, as well as provide a detailed step-by-step process to establish this integration. So, let’s dive right in!

Benefits of Integrating WooCommerce Product Catalog with Facebook & Instagram
Integrating your WooCommerce business with Facebook and Instagram presents an excellent opportunity to expand your customer base while leveraging the unique features offered by each platform. By merging these platforms, you can enhance your sales potential and increase brand visibility. Let’s explore the key benefits that come with integrating WooCommerce with these social media giants:
Amplify Your Reach
The possibilities are boundless when your WooCommerce product catalog seamlessly integrates with Facebook and Instagram. By expanding your presence across multiple platforms, you unleash the potential to reach an exponentially larger audience.
Whether customers are scrolling through their Facebook feeds or indulging in the visual feast of Instagram, your products will be right there, capturing their attention and inviting them to explore further.
Seamless Synchronization
Gone are the days of juggling multiple platforms and grappling with the tedium of manual updates. Through integration, your WooCommerce inventory becomes effortlessly synchronized with Facebook and Instagram. Prices, product information, and inventory status are automatically updated, ensuring consistency and accuracy across all platforms. With a few simple clicks, you can manage your catalog from a central location, saving time and eliminating the headaches of disjointed data.
Personalized Advertisements
The true power of social media lies in its ability to understand and target individual preferences. Facebook and Instagram harness the wealth of user data to deliver personalized advertisements directly to the screens of potential customers.
By integrating your product catalog, you gain the ability to craft hyper-targeted campaigns that resonate with specific demographic segments. No more wasted resources on broad marketing approaches—now, every ad dollar yields maximum impact.
Unleash Visual Storytelling
A picture is worth a thousand words, and Instagram is the perfect canvas for your visual storytelling. By integrating your WooCommerce product catalog, you tap into the immersive world of Instagram, captivating your audience with visually stunning imagery and compelling captions. Showcase your products in their best light, evoke emotions, and create an unforgettable brand experience that leaves a lasting impression.
Centralized Product Administration
The key to efficient operations lies in streamlining your workflow. Through integration, you can manage your product administration from a centralized location. From adjusting prices to adding new products, everything can be done seamlessly within your WooCommerce store, reflecting across Facebook and Instagram in real time. Say goodbye to the hassle of navigating multiple platforms and embrace the simplicity of unified control.
Enhanced Customer Experience
With a synchronized product catalog across Facebook, Instagram, and WooCommerce, you create a cohesive and immersive customer experience. Potential buyers can seamlessly transition from social media platforms to your online store, finding the same products, information, and pricing. This seamless journey fosters trust, boosts confidence, and ultimately increases the likelihood of conversion.
How to Integrate WooCommerce Product Catalog with Facebook & Instagram?
To simplify the integration process, a plugin designed specifically for WooCommerce and Facebook & Instagram integration can be utilized. One such plugin is the ELEX WooCommerce Catalog Feed for Facebook & Instagram. This powerful tool allows you to effortlessly integrate, synchronize and update your products on Facebook and Instagram.
Let’s walk through the step-by-step process of integrating your WooCommerce store with Facebook and Instagram using the ELEX WooCommerce Catalog Feed for Facebook & Instagram plugin:
Step 1: Set up the Facebook Account and Business Page
An active Facebook ad account, in addition to a Facebook business page and an Instagram business profile, are prerequisites for catalog creation. They can be easily created if you don’t already have them.
All of your Facebook and Instagram sales can be set up and managed with the Commerce Manager.
Step 2: Install the ELEX WooCommerce Catalog Feed for Facebook & Instagram Plugin
After the plugin has been installed and activated, go to WordPress Dashboard > Facebook Shopping Feed to customize the plugin’s settings.
Step 3: Link WooCommerce to Facebook
Connect your WooCommerce account with your Facebook page under the Settings tab. Google Product Categories can also be translated into a language that better suits your company’s needs. Google’s Product Category Language can be switched from English to any other language to better suit your company’s needs.
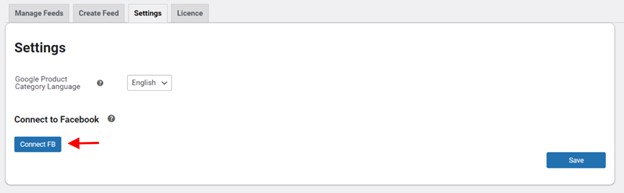
When you connect your Facebook and Instagram accounts to your WooCommerce business, your customers will be able to find you more easily.
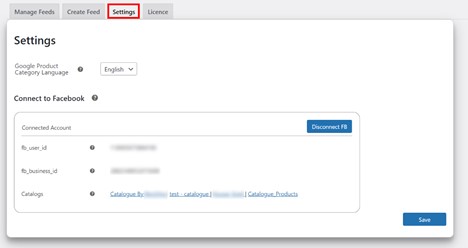
All of your product catalogs, as well as the Facebook Business, account you used to connect it, will be shown in the Connected Account box.
Step 4: Customize the Plugin’s Settings
Changes to the plugin’s default settings can be made by selecting Create Feed from the Plugins menu.
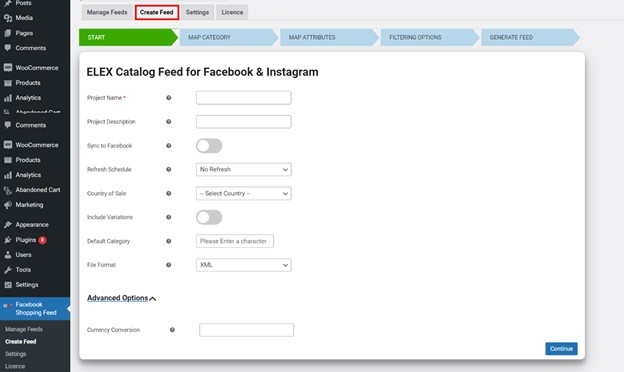
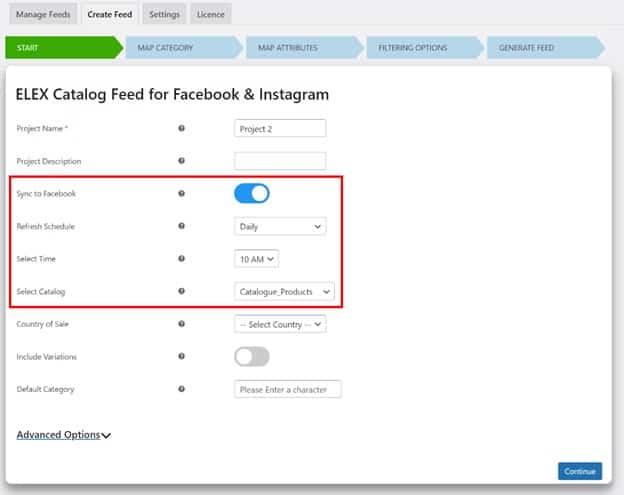
Your project needs an appealing name and a detailed description, and you should also check the Sync to Facebook box.
After turning on Facebook auto-sync, you will be given the option to set a refresh schedule and time for the chosen catalog feed. Your feeds cannot be automatically synchronized until you complete this step.
You also have the option of providing the product feed file type and the country in which the product is sold. Product feeds can be customized to include options like size, color, and more by selecting the Include Variations option.
Under Advanced Settings, you can change the default category, select which countries can buy from you, and adjust the currency conversion and currency code.
Next, link your product categories with their corresponding Google ones by clicking on the tab labeled “Map Category.”
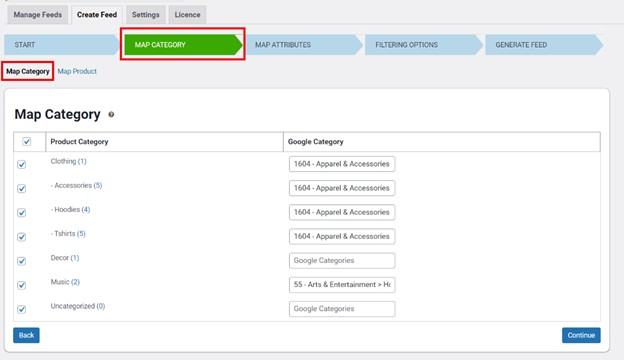
Connecting your products to Google’s default category will increase the likelihood that they will appear in social media product searches. The plugin will propose categories as you type, so all you have to do is get started in the text box and pick one.
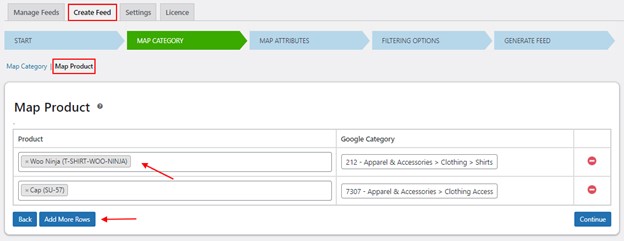
You can map specific products instead of entire product categories by switching to the Map Category page and then to the Map Product sub-tab. If you include the product names, Google will automatically match them to the most relevant categories.
The product’s attributes can then be mapped in the subsequent “Map Attributes” section.
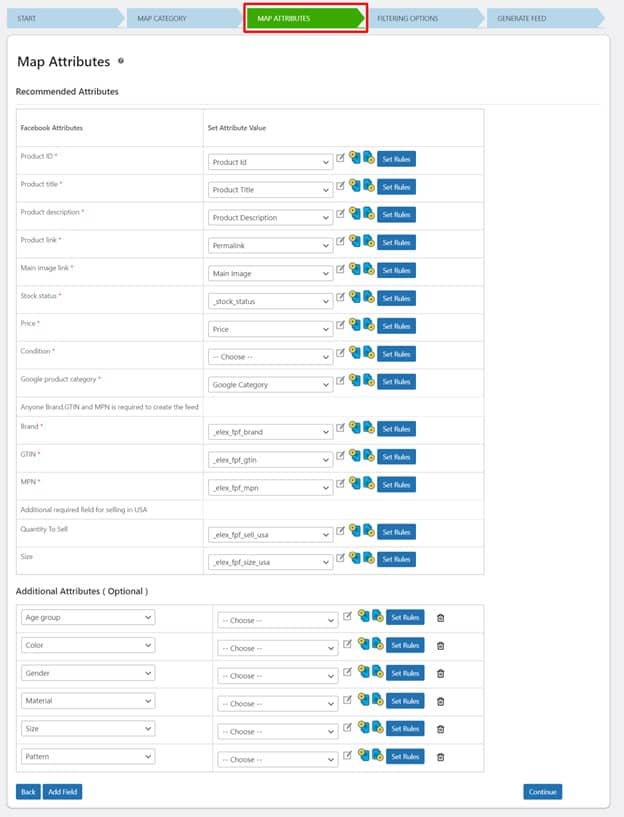
You can link your product attributes to Facebook’s pre-existing set of attributes. In a lot of cases, the plugin can automatically map out the most important features. Manually adding or removing data and establishing criteria can help you get more accurate results.
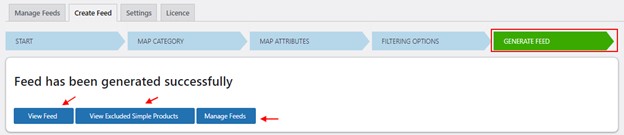
Finally, navigate to the Tab for Filtering Options.
Select only the products you want to include in your product feed by using the filters on this page.
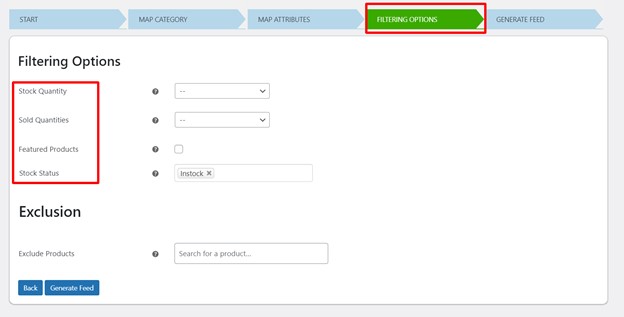
Feeds can be filtered to include only the products you specify depending on factors like stock levels and sales. It is possible to design a customized feed that includes Featured Products but excludes certain items if necessary.
When you’re satisfied with the configuration, select Sync Products. Doing so will enable you to view and manage the generated feed.
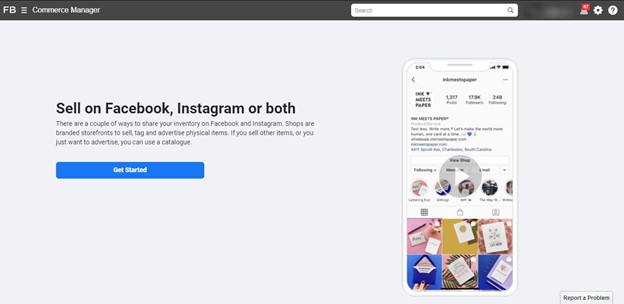
Step 5: Upload the Generated Product Feed to Facebook Commerce Manager
The product catalogs and sales on Facebook and Instagram may be managed with the help of the Facebook Commerce Manager. The Commerce Manager requires the product feed file to be uploaded, which contains information on each product in your catalog.
Sign in to Commerce Manager and click Get Started.
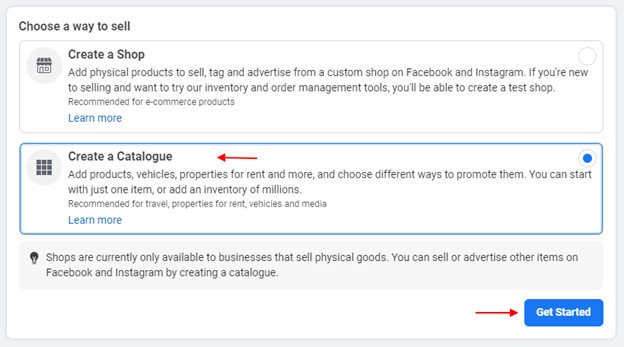
Click Create Catalog to begin creating a catalog.
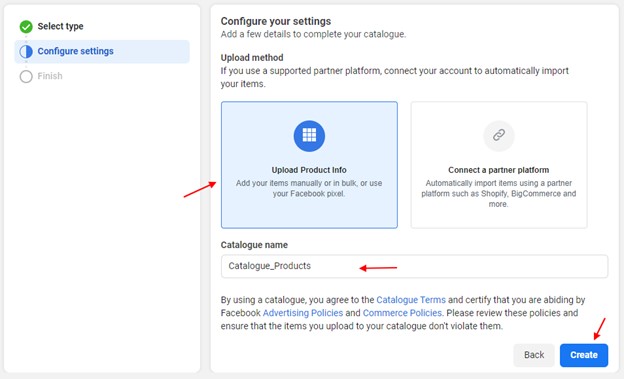
Select your catalog type.
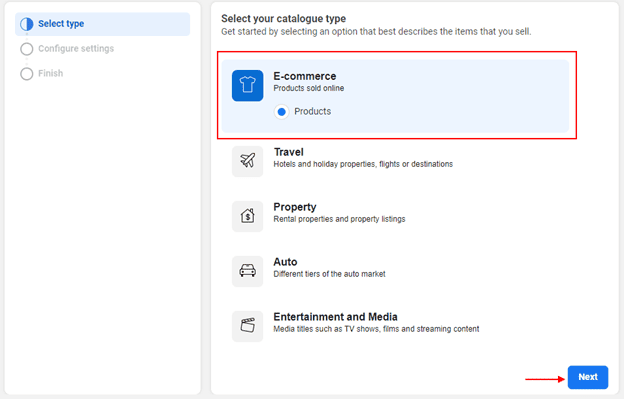
You can add product details by clicking Upload Product Info, giving the new catalog a name, and then clicking the Create button.
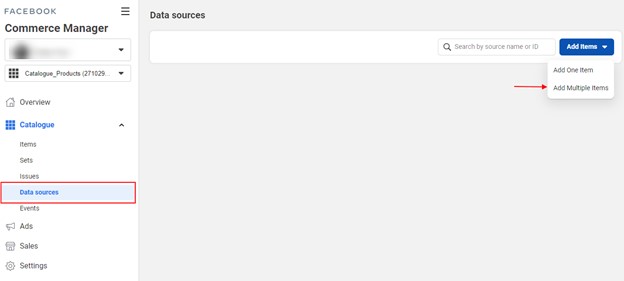
Simply select the View Catalog option in order to check out the catalog. On the left-hand side of the Catalog menu, there will be a Data Source option.
Select Data Feed from the list of Add Items.
You can submit your products to Facebook and Instagram in three different methods. You can use Google Sheets, enter an external URL, or select a file from your computer to upload in the next tab.
After selecting your product feed file, all that’s left to do is click Upload.
Once the product feed has been added to Commerce Manager, you will need to link your Instagram account in order to begin selling your products there. The same catalog will be synchronized with Instagram right away.
So, there you have it! We have successfully integrated our WooCommerce store into both Facebook and Instagram, and we have also uploaded a product feed file that we generated from scratch.
Conclusion
By integrating your WooCommerce store with Facebook and Instagram, you unlock many opportunities to maximize your sales potential. Showcasing your products on multiple platforms while effortlessly keeping them up-to-date allows you to provide a seamless shopping experience to your customers.
The step-by-step instructions outlined in this guide, coupled with the ELEX WooCommerce Catalog Feed for Facebook & Instagram plugin, make the integration process quick and simple.
Now it’s time to take action! Leverage the power of social media integration, establish a strong presence on Facebook and Instagram, and elevate your WooCommerce business to new heights of success.