In our busy everyday life, we find ourselves shifting our attention from one point to the next, usually until the evening when we can finally unwind. A hectic schedule such as this has made speed and convenience a priority – how fast can we complete one task before we tackle the next one, the next one after that, and so forth.
These habits of ours can be seen, among other things, in our communication – from social media and business/professional communication to (in most cases) even our private lives – everything is concise and to the point. Long emails are a thing of the distant past. When was the last time you used your phone for a non-emergency call that’s not your parents or 70-year-old grandmother? We even order our food through apps now!
With everything laid out like that, it’s only natural to transfer all these habits and tendencies to our web presence. There isn’t much difference between our real life and online persona, especially regarding communication. We’re sharing our content (no matter what that may entail), looking for momentary feedback and quick responses. To no surprise, we expect the same from the services we’re using and the products we buy. Of course, you can’t interact with the services and products, but you most certainly can with the sites that provide them.
Get ready to chat
You’ve probably already seen the growing number of sites that have replaced the traditional contact forms and emails with direct chats. Users tend to be much more relaxed using something they already see daily, and the information you get is almost instant. It is, therefore, crucial to find the best possible plugin to implement this feature on your site. One we’ve found that does the job at a very high level is 3CX Live Chat.
It’s an all-in-one solution that provides you with much more than simply adding a chat button to your pages, and we’ll go through everything, from the installation process to the advanced features you’ll get to set up afterward. Note that we’ll be focusing on the 3CX plugin for WordPress, but it’s also available for Drupal, Joomla, Wix, and Weebly.
Free calls and video
Two main things instantly set 3CX Live Chat apart from the competition out there. The first one – is the unique option to elevate your live chat into a live audio or video call. Even though for the most part, you’ll probably be using the chat since it’s more practical, however, if the problem ever gets too complex to discuss over messages, the customer can call the same agent straight from the live chat bubble. There is no need to exchange numbers or repeat the issue again to someone else – all designed to boost customer experience.
The second best thing about the 3CX Live Chat plugin is the fact that it’s a completely free solution. Powered by 3CX StartUP, the live chat plugin is available to small businesses and startups without any charges for up to 10 users. There are no limitations on the number of chats or messages and no hidden costs as a whole.
Getting started
There are a couple of ways you can get started with the service – opt for the hosted version, where you don’t have to install or maintain anything, leaving the work to 3CX, or you can download and install it locally or in your private cloud.
Right off the bat, the hosted option seems like a good way to go, especially if you’re new to the whole website management game and are looking to outsource as many technical tasks as you can. Since the system will be stored on the shared instance, 3CX will take care of the system setup, updates and maintenance scrapping the need for an in-house IT specialist.
The 3CX StartUP gives users access to the 3CX Web Client – an all-in-one communications hub. Together with the live chat plugin, these guarantee ultimate customer support To start off, you firstly need to register for your 3CX account:
-
- Sign up for your free account.
- Add your users or agents that will receive calls and answer messages to the system and assign them roles (managers, receptionists, standard users).
- Determine if you’ll use a SIP Trunk, which is used for inbound and outbound calls. If you don’t plan on using phone calls and instead only Live Chat and internal communication, just click “Next”.
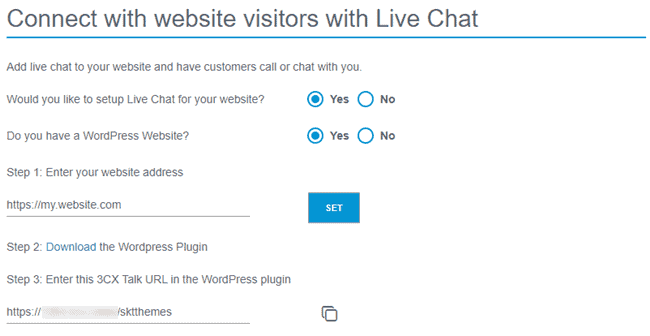
- Start setting up your live chat by choosing the option “Yes” and selecting if you have a WordPress website or not. Enter your website URL and click “Set”.
-
- You need to link the Web Client to the plugin, so download and activate the plugin and then copy the 3CX Talk URL and save it. The 3CX Talk link is what is used to make the connection between your website to your StartUP account. It creates the bridge that shares the chats, calls, and video calls. No telephone calls are needed because everything goes through the user’s browser resulting in no expense on either end.
- The process is now complete. Through the “Login” button you can access your dedicated 3CX Web Client which is the place all your customization options and chat messages are located.
While you’re still here you can immediately set up the Live Chat.
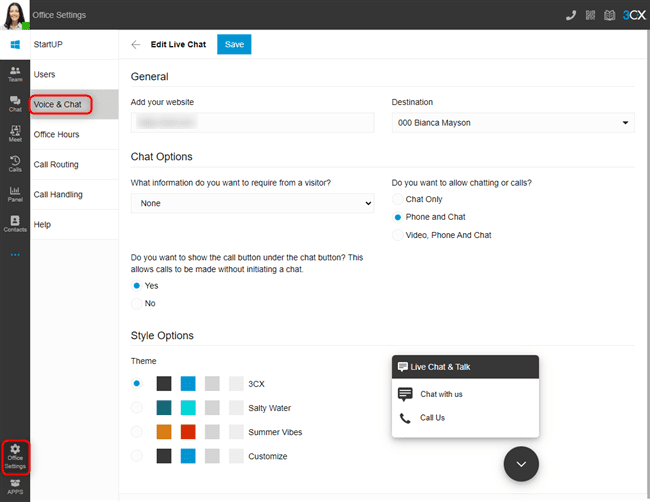
- Go to “Office Settings > Voice & Chat” and click on the pencil icon to enable answering calls and messages from the Web Client.
- Your website address will already be populated from the wizard process, but you can change it either now, or later.
- The “Destination” field shows where live chat messages or calls will be sent. To change the “Destination”, navigate to “Office Settings > Call Routing” and choose your destination. By default, the live chat will be routed to a ring group.
- Under the “Chat Options” section, use the drop-down selection to choose what information visitors need to provide.
- Use the radio buttons to choose if you want to allow “Chat Only”, “Phone and Chat”, or “Video, Phone, and Chat”.
- If you want the option for “Call Us” to be displayed immediately on the chat bubble, use the radio button to show or hide the option.
- Under “Style Options” choose from one of the 3 pre-defined themes or select “Customize”. The last option lets you fully customize the scheme.
- Use the preview of the chat bubble to interact and test the functionality and click on “Save” to finish up.
The plugin
So now that you’ve done everything you needed to do on the site of the app, it’s time to head back to your WordPress backend and set up the plugin. It goes from basic things that have to be covered for the plugin to work to more advanced options, which you can leave at their default values or change them (the plugin will function either way).
First, you’ll need to set it up, though.
- Log in to the admin panel of your WordPress website
- Navigate to “Plugins” and click “Add New” at the top of the page
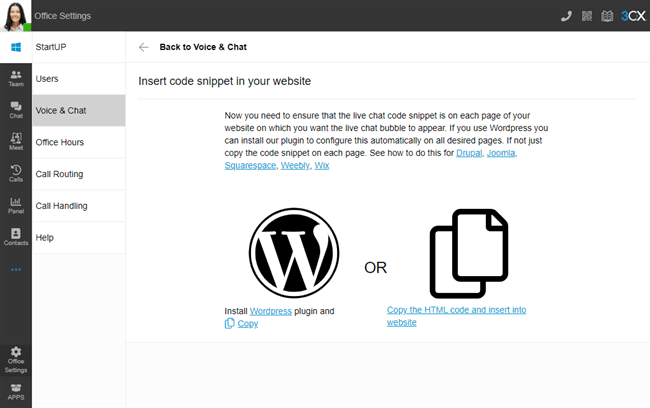
- Click on “Upload Plugin” at the top and choose the file you downloaded during the sign-up process. The same can also be obtained from the Web Client in “Office Settings > Voice & Chat” and click the ‘i’ icon next to the pencil icon. Then click “Install Now”
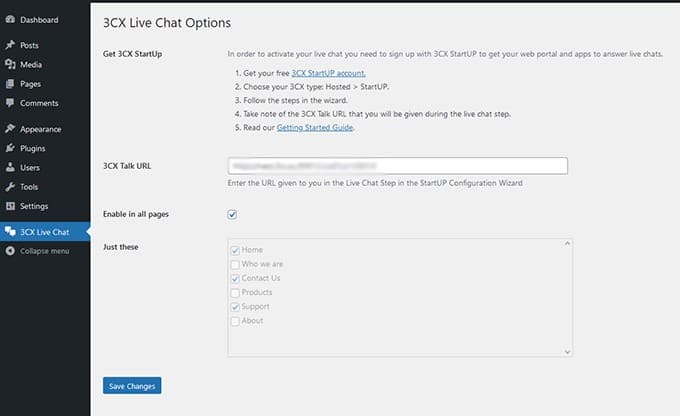
- After it’s installed, click on “3CX Live Chat NextGen” in the sidebar
- Paste the URL you copied earlier (the 3CX Talk URL). If you haven’t copied it, you can find it again in the Web Client in “Office Settings > Voice & Chat” under the “Information” field or within the email you’ve received.
- Either tick the box to show the chat on all pages or use the tick boxes below to select individual pages. Finally, click “Save Changes” and you’re all done.
The basics
Naturally, the chatbox needs to be enabled for everything to work. However, it’s useful to have an on/off switch if you’re ever in a position where you need to simply turn the feature off. For example, if you’re making serious tests or are temporarily closing down the chat. All other settings remain, so if you ever need to bring the chat back, it’s just a click away.
Other things covered in the general settings revolve around your users – if an email and/or name is required to use the chat, or if signed up, users will be automatically recognized when using the chat. Other simple but useful options include enabling the chat on mobile devices, playing sounds, and deleting the database in case of an uninstallation.
Going down further, we get to the “filter” section, more precisely deciding where you want the chat window to be included or excluded. You can make the distinction between your home page, individual pages, and post types. Some sites like to keep the chat option solely on the contact and/or help pages, so having the option to mix and match so easily helps a great deal.
Additionally, if you have Google Analytics enabled, there’s a special feature that lets you integrate data from the plugin and let it be analyzed to give you even more insight into the behavior of your visitors and your backend staff.
Make it look good
Content is important, of course, but that first impression is key to getting a visitor to the “real stuff”. So, just like everything else that’s featured on your site, you need to incorporate the chat window to fit your branding. To do this right, two sections are used – chatbox and styling.
The chatbox settings are focused mainly on what’s displayed and where the chat window is positioned, along with the language that’ll be featured.
Aside from that, you’ll get to set your icons, logos, and pictures. The chat icon has some widely recognized icons, so changing those too much should be avoided. On the other hand, uploading your logo to the window is a perfect way to additionally raise your brand awareness. If you also add the agent’s picture to make the conversation seem more personalized and humane. You can also choose if a greeting will welcome web visitors and choose on which pages it will be present. The styling options are all about looks. You’ll get to change the color theme – it’s smart to choose one that fits in well with the overall design of your pages but at the same time differs slightly, making it somewhat emphasized. Along with the theme, you’ll get to choose various titles, labels, automatic messages, and animations. All of these are little things that, when added up, project a feel of an approachable and professional site and, subsequently, potential services or products the site provides.
Downtime
If you don’t offer around-the-clock, 24/7 support, it’s important to notify your visitors of their inputs through automatic offline messages. This can vary from being info about your working hours to confirmations that their message has been received or an error in their input (bad email address, for example).
Putting up automated messages is important because it doesn’t leave your visitors wondering if anything they’ve even reached someone on the other side (think of automated emails when you’re out of the office with relevant information and instructions). The great thing is that you can set everything up and just turn it on or off with a single click.
Speaking of working hours, there’s a specific section dedicated to configuring yours. The way you set up your data here will then be pulled to all other features of the plugin. Just remember to update your times if they’re ever changed.
Other features
If you don’t touch any other feature 3CX Live Chat has to offer, both you and your visitors will have the full experience that was originally intended. However, there are other things you can look into to expand the overall functionality even further. For example – the chat server, can be standalone or run through 3CX (if you chose the former, you need to set it up separately, but the latter can be configured right within the plugin).
You’ll get to set up the privacy settings like data retention or creating a custom notice, which is much more important with the advent of GDPR. Furthermore, for the more experienced, there is the Gutenberg block and embedded code section where you can check out the underlying code and even add to it if you think there’s something that can be improved.
Here’s a quick summary of what you can expect to have access to when you are implementing 3CX Live Chat as part of the StartUP Plan:
- Convert from a chat to a voice or video call in just one click
- Interact using the web, iOS, and Android apps
- Easy to use interface integrates calls, live chats, FB &SMS
- Assign chats to a particular agent, or have groups of agents answering
- Includes desktop notifications
- View missed chats and chat history
- Pop-out chat box
- Customizable design
- No advertising or powered by link
- No monthly subscriptions required
- Simple and slick interface
- Set up and installation takes up less than a minute
- Completely free solution perfect for small companies
The web client
The 3CX Web Client that we’ve mentioned a couple of times now, represents a more streamlined solution that handles all your communications channels in the same place. It will be your all-in-one interface that features CRM, Facebook messages, and SMS integration. Aside from the messages, which are also traced here, so no resource strain on the plugin/site, you’ll get to manage pretty much all aspects of direct communication with your visitors. Adding users, opening chats, tracking groups, starting calls or video meetings, and much more are all done in the same UI – talk about convenience!
WordPress isn’t yet designed to work on devices like phones or tablets. You can access it and try to work, but because of all the complexities, it’s very far from a great solution. On the other hand, the 3CX Web Client is “cloud native”, designed to work in a browser, and is completely scalable both in display and in function to devices with smaller screens and limited navigation options. This makes it a far superior solution for handling things on the go.
Speaking of navigation, the web client unifies all the most common ways of communicating with a site’s staff, meaning that you won’t ever have to leave the single window you need open for the client to work – no switching tabs or windows – it’s all about keeping it simple.
Summary
Both from a newcomer’s perspective and that of an experienced user, the 3CX Live Chat plugin represents a robust tool that will cover everything you would ever need in a chat-providing app, including call and video call features, which are unique.
Additionally, just to reiterate once again, the StartUP Free package is free forever. Taking everything into account, you owe it to yourself and your visitors to, at the very least, give it a try!