Time is gold. And saving enough while transforming a newly installed WordPress site into something purposeful doesn’t just depict proficiency. The reward includes overwhelming satisfaction, encouraging goal setting, and a motivation to do more. Who knows, it might even help you start something like a webinar platform in record time.
It’s a no-brainer to understand why automation is so promising, even though the algorithm is a lot more on another level. Aside from coping with several new web technologies, developers must find ways to cut-down repetitive tasks in web development. And managing multiple plugins can only get easier with tools that could turn the process into a single click or command.
This article will be useful to anyone that’s looking for ways to bulk install plugins in WordPress using WP-CLI. Of course, the most common method is the use of WP-CLI, which is not too easy. It involves some technical stuff and requires a little understanding of how command-line works. But don’t fret, the steps here are very clear for almost anyone to understand. Alternatively, or as a beginner, you could use the WP Reset plugin to manage and bulk install WordPress plugins without writing any codes or commands.
The first section of this article will introduce WP-CLI and explain how to install WP-CLI on your server if it has not been installed by your hosting company. The second section will provide a step-by-step guide on how to bulk install WordPress plugins using the WP-CLI. You’ll also learn about a resourceful web development tool WP Reset plugin that can equally help you to install multiple WordPress plugins in just one click.
WordPress command-line interface (WP-CLI)
The WP-CLI is a free command-line interface that lets you perform all sorts of WordPress site management without the need for a browser. The goal is to help in simplifying WordPress tasks, such as the installation, database backup, themes, and plugins installations/updates.
WP-CLI helps WordPress developers to stay on-task and organized. You can perform many tasks available on your WordPress admin dashboard using just a few commands. This helps you to become more productive than you could ever be, save more time, and enjoy error-free WordPress site management experience.
However, you may need to install WP-CLI on your server if it’s not already installed by your web hosting provider. This is useful if you have either a VPS hosting account, a cloud server or a dedicated hosting account. Most shared hosting plans usually have WP-CLI pre-installed.
Requirements for WP-CLI installation
- An active hosting account with support for SSH (Secure Shell) access
- Your server’s operating system should be either Linux, Cygwin, FreeBSD, Apple OS X or any UNIX-like operating system.
- You must have WordPress 3.7 or later
- PHP 5.4 or later
- A little knowledge of command-line interface
How to install WP-CLI (step by step guide)
You must have root access to your server to install WP-CLI or an account with permissions to read and write in the “/var/www/html” directory. There could be a need to request it from your hosting provider if you don’t have it before now. Also, log in to WHM and check if there’s any icon that lets you request for root access.
What is Root Access?
Root access (only used in the Unix-like environment) is the equivalent of the administrator account we know in the Windows server. It’s a user account that lets you manage; edit, add or remove files on a server. In Linux, an administrative account is called “root”. A root user (also known as SU or superuser) has more rights on a server than a standard user.
N/B: Having root access to your server may limit the quality of assistance you could receive from the support team of your hosting company. It may not be easy for the team to immediately fix or undo any actions you have taken as the root user if you’re having issues fixing it.
Step 1: Log in to your server
Login to your server with the root access using the following command
su – (user-name)
Where user-name is the user-name of the superuser if you are provided with any. Otherwise, ignore the command in a bracket and hit the enter key.
This should request for the su password. Supply the password and hit enter. The $ at the beginning of your commands should change to # once you log in using the root access.
N/B: You are advised to first login to your server with a standard (normal) user account before switching to the root user. This is because most hosting companies usually disable remote root login over SSH due to security reasons.
Step 2: Download the WP-CLI
You could use either the curl or wget command to download and install the latest version of WP-CLI, which is available at https://raw.githubusercontent.com/wp-cli/builds/gh-pages/phar/wp-cli.phar.
Enter the following command to download the WP-CLI using cURL
curl -O https://raw.githubusercontent.com/wp-cli/builds/gh-pages/phar/wp-cli.phar
For wget command, enter the following
wget https://raw.githubusercontent.com/wp-cli/builds/gh-pages/phar/wp-cli.phar
Any of the above commands should download and extract the WP-CLI files into your root user directory.
Step 3: Make the WP-CLI files executable
Making the WP-CLI files executable is the final step but we need to get things more organized by moving the entire files into a folder in the bin directory. Name the folder “wp” so you wouldn’t need to include –CLI to access the folder while using the WP-CLI commands.
The following command will make the WP-CLI files executable
chmod +x wp-cli.phar
Move the WP-CLI files into a folder named “wp” in the bin directory using the following command:
sudo mv wp-cli.phar /usr/local/bin/wp
Congratulations! You have just installed the WP-CLI on your server if you have followed the steps above correctly. You would gradually grab some of the WP-CLI commands as we learn how to bulk install WordPress plugins using the WP-CLI in the next section.
N/B: You may get an error like “YIKES! It looks like you’re running this as root…” if you choose to execute the WP-CLI commands as a root user.
Remember, the su user can assume the authority of any user on your server. Hence, you can fix this error by granting the root user access to control the existing WordPress core in every command. This is done by adding –allow-root at the end of your commands such as:
wp core version --allow-root
How to bulk install WordPress plugins using WordPress command-line
Bulk installing your favorite WordPress plugins using the WP-CLI requires one major thing. A list of the plugins with their correct names. This is very important because there are no options to view a list of plugins with similar names to decide which is correct. Installation commands go straight to fetch the plugins and install them without any delays.
Step 1: Access the list of plugins you wish to bulk install
As mentioned earlier, having a list containing the correct names of your plugins is very crucial in the bulk installation of plugins using the WordPress command-line. It’s easier to gain this list if you have them compiled on wordpress.org. How do you build a list of favorite plugins on wordpress.org?
While signed on to wordpress.org, locate each of the plugin’s wordpress.org page and click on the heart button next to the download button.
To access the list of all your favorite plugins, logon to your WordPress dashboard, click on plugins>add new. Enter your wordpress.org username and click on the get favorite button.
Step 2: Bulk install multiple plugins
The command to install a single WordPress plugin using the WP-CLI is as follows:
wp plugin install PLUGIN_NAME
Now, to combine multiple plugins in the command above, simply give space and write the plugin’s correct name. Having generated the list of your favorite plugins, use the following command to bulk install multiple WordPress plugins.
wp plugin install PLUGIN_1_NAME PLUGIN_2_NAME PLUGIN_X_NAME
The above command works just fine as long as you keep adding more plugin names correctly. The letter X in the command example represents the position of the next plugin you wish to enter, which is not relevant. There’s no limit to the number of plugins you may want to add.
For example, if I wish to install WP reset alongside WooCommerce and Elementor page builder, the command should be as follows:
wp plugin install wp-reset woocommerce elementor --allow-root
Of course, you can only include –allow-root to the command if you’re running them through a root user and often get an error without it.
N/B: The plugin name used for bulk installation using the WP-CLI is often the name at the tail of the plugin’s wordpress.org download page URL.
How to activate multiple plugins immediately after their installation
This is done by simply appending –-activate to the command, that’s placing the instruction next to the last plugin’s name. While this could help save time, it’s not advisable to activate plugins that require onboarding configuration immediately after their installation.
WP-CLI Command to install and activate multiple plugins
wp plugin install wp-reset woocommerce elementor --activate --allow-root
After installation, you can bulk activate multiple WordPress plugins or deactivate them using the following command:
Activate a list of plugins:
wp plugin activate wp-reset woocommerce elementor --allow-root
Deactivate a list of plugins:
wp plugin deactivate wp-reset woocommerce elementor --allow-root
To activate all the plugins not active:
wp plugin activate --all --allow-root
To deactivate all the active plugins:
wp plugin deactivate --all --allow-root
How to manage multiple plugins using WP-CLI
Managing multiple plugins may entail viewing all at once to see which is active, their versions and update. To view multiple plugins using WP-CLI, use the following command
wp plugin list --allow-root
Run the following command to bulk update multiple plugins
wp plugin update --all --allow-root
You could equally replace the –all section of the command with a list of plugins you wish to update.
Bulk plugin management using WP Reset
From bulk installing multiple WordPress plugins to activation, deactivation, and bulk updating, the WP Reset offers these plugin management features without any need for commands or codes.

The WP Reset plugin makes things a lot easier because there would be no need to memorize any plugin’s slug or accurate name before you can install them. The stress of having to input every plugin in the command is also time demanding, even though it’s easier than installing through the WordPress dashboard.
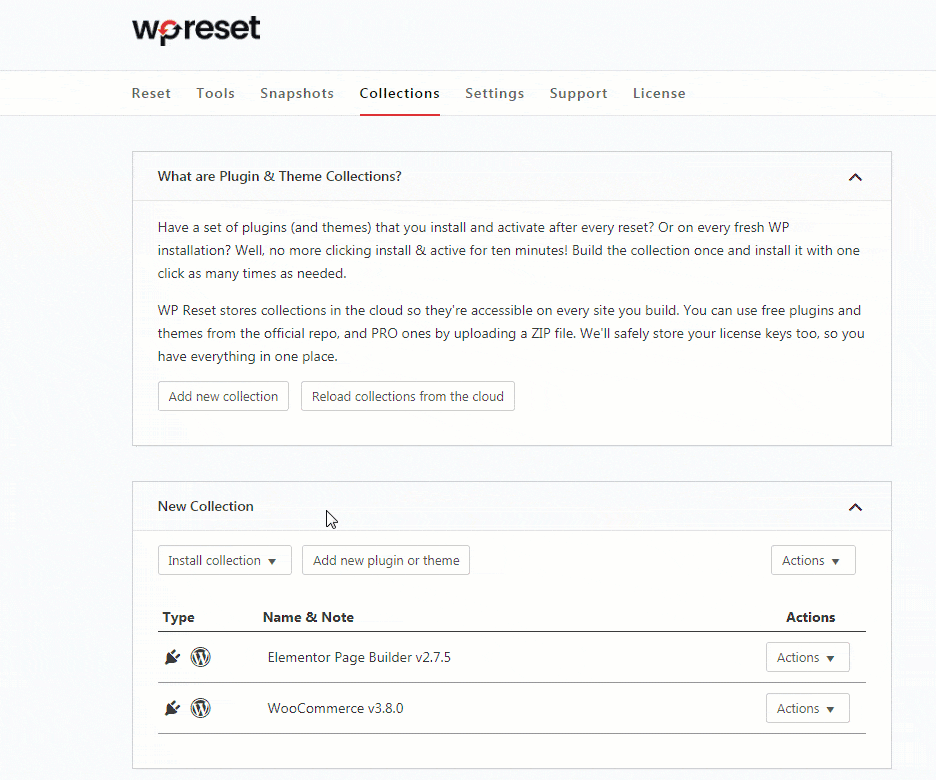
After creating your plugin collection in WP Reset by just marking them as favorites, the plugin makes your collection available from anywhere. They are saved in the cloud and would show up as soon as you log in.
Conclusion
WP-CLI is a powerful tool for managing multiple WordPress plugins at a go, aside from other WordPress maintenance tasks not mentioned in this article. The command-line allows you to save lots of valuable time while minimizing errors. Think of it as flows in onboarding. As explained here by Appcues, flows are a key element of any user onboarding experience. They save time and stop you from making mistakes in the process.
You may need to familiarize yourself with the commands for some time using a newly installed WordPress site if you are new to WordPress command-line. However, this is not so for WP Reset, which has several protection tools to ensure that you don’t erroneously ruin your WordPress site.
Hi,
Actually,I’m looking for a easy to use tricks to automatic wordpress plugins install.I hope i have got the right solution for my wordpress.I have little knowledge about PHP but I hope this article will be perfect for me.Thanks man for your wonderful guides